FactSage 8.3 Installation - Show Me
|

(Revised October 2023)
FactSage 8.3 runs under Windows.
Minimum System Requirements: Equivalent to the minimum system requirements for running Microsoft Windows 10 operating system.
Recommended System Requirements:
Operating System: Microsoft Windows 10 or above;
CPU: Intel Core i7 2.8 GHz (or an equivalent AMD processor) or better:
RAM: 16 GB or more:
Storage: 7200 RPM or better HDD or SSD.
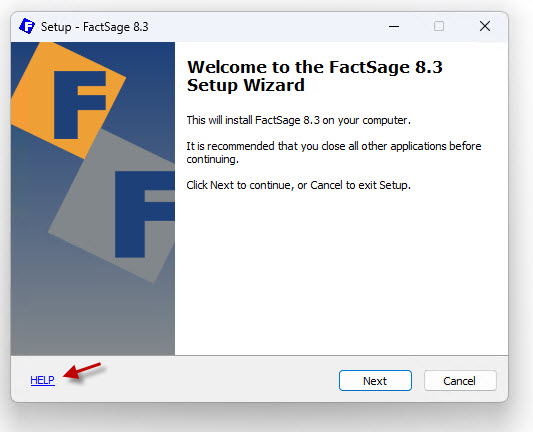
Open Setup-FactSage83.exe:
- it may take up to a minute or longer to display FactSage 8.3 Setup - Verified publisher Thermfact Ltd.
- click 'Yes' to display the FactSage 8.3 Setup Wizard.
 |
The FactSage 8.3 Setup program enables you to install
FactSage 8.3 on a new computer or update/refresh an existing FactSage 8.3
installation to the full FactSage 8.3 package.
Click on HELP to display this file you are currently viewing.
FactSage programs and security settings make extensive use of the internal clock and calendar.
Before continuing make sure the date and time stored in the computer are correct.
Click on Next to continue.
|
|
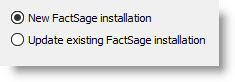
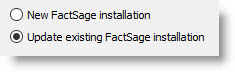
New installation or update?
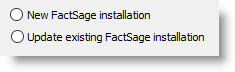 |
You must select one of :
|
|
2. New FactSage Installation
|
If FactSage 8.3
is already installed on the computer then ignore this section and
go to 3. Update/Refresh FactSage 8.3.
 |
When FactSage is installed for the first time on a computer that runs under Windows Vista,
Windows 7, 8, 10 and 11 you must have
full administrator privileges.
Select option New FactSage Installation and then Click on Next.
|
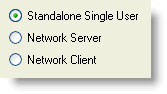
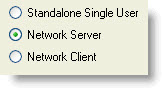
Type of installation
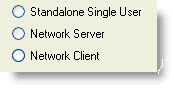 |
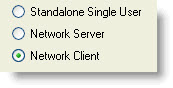
Are you going to install FactSage as a Standalone Single User
or as part of a Network?
Note,
you can not use the computer to install FactSage on another computer or on
a remote disk. |
|
2.1 Standalone Single User
|
Standalone Single User
- the complete FactSage package will be installed on the computer. The program cannot
be accessed by other computers. The Standalone computer requires a security key (dongle)
attached to a USB port.
 |
Select option Standalone and then Click on Next.
|
 |
Personal information
What is your user ID and registration key?
In many cases this information is filled in for you.
If not then enter your Customer ID (1 - 9999) and the Registration key that we have sent you.
|
|
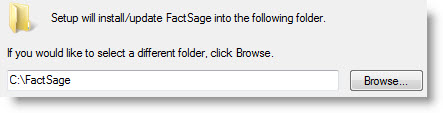
Select Destination Location
Where should FactSage be installed?
We recommend you use the default folder c:\FactSage
Alternatively, you can use a long file name with up to 64 characters including spaces.
In this case we recommend you use the sub-folder \FactSage - for example:
c:\MyApps\My Thermo Applications\FactSage
|
 |
| |
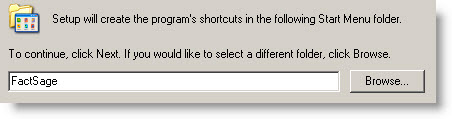
Select Start Menu Folder
Where should Setup place the program shortcut?
We recommend you use the default name FactSage.
|
Setup is now ready to start installing FactSage.
For screen shots of the installation process click on
Show Installation Process.
|
After Setup has finished installation, click on the FactSage shortcut to launch the program.
|
 |
Warning message - access to local network
When you launch FactSage a program called CheckKeyEB.exe is run and
it checks for security keys (dongles) on the network.
You may get a warning message from your antivirus and firewall software about accessing the local network.
It is safe to grant CheckKeyEB access to the local network.
FactSage HASP Security Key

|
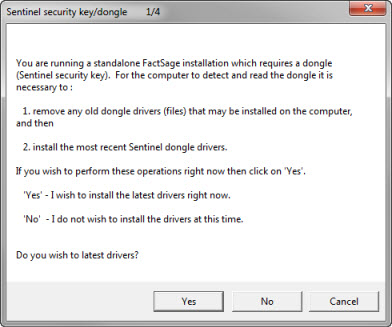
For a Standalone Single User a FactSage HASP security key (dongle) must be attached to the computer.
1. - Dongle drivers out of date or not installed
With a new installation it may be necessary to install the Sentinel HASP drivers
(i.e. files) that activate the dongle (security key). See screenshots that follow next for instructions.
Alternatively other error messages may be posted:
2. - Dongle not detected
3. - Invalid customer ID stored in dongle
4. - Dongle factory ID missing from profiles file
5. - Dongle expiration date stored in profiles file has passed
For instructions on what to do click on Dongles and Drivers.
|
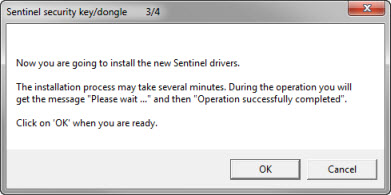
It is recommended that you install the latest drivers at this time. Simply follow the instructions as shown in the following screenshots 1/4, 2/4. 3/4 and 4/4.
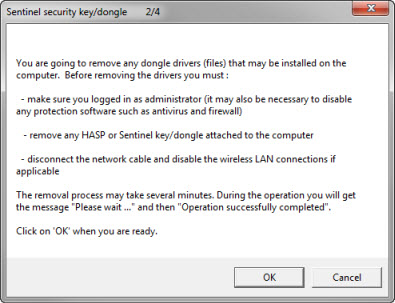
Before you start to install the drivers make sure that you:
- logged in as administrator (it may also be necessary to disable any protection software such as antivirus and firewall)
- remove any HASP or Sentinel key/dongle attached to the computer
- disconnect the network cable and disable the wireless LAN connections if applicable
|
|
|
|
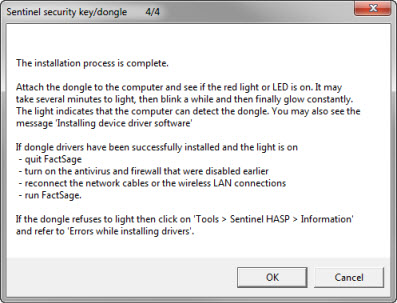
When the installation process is complete attach the dongle to the computer and see if the red light or LED is on. It may take several minutes to light, then blink a while and then finally glow constantly. The light indicates that the computer can detect the dongle. You may also see the message 'Installing device driver software'.
If dongle drivers have been successfully installed and the light is on
- quit FactSage
- turn on the antivirus and firewall that were disabled earlier
- reconnect the network cables or the wireless LAN connections
- run FactSage.
If the dongle refuses to light then click on 'Tools > Sentinel HASP > Information' and refer to 'Errors while installing drivers'.
For more details click on Dongles and Drivers.
| |
FactSage 8.3 main menu after a successful installation.
|
Network Server -
the complete FactSage package will be installed on the computer in a public
folder that is 'share read-only' to the Network Client computers on the network. The files will
be read and copied by the Network Clients but there will be no write
operations to the server. The Server computer has a password.
If the FactSage Installation program is being run by someone who is unfamiliar with
FactSage software and databases (for example IT personnel), we recommend that the person works with someone who
has already installed FactSage as a Standalone Single User,
and successfully accessed the various modules and databases.
In a small network of several computers the FactSage Network Server can be any computer, but not a virtual machine.
It is important
that the computer has lots of free disk space (for future updates) and that it is
reliable. Speed and RAM are not important.
 |
Select option Network Server and then Click on Next >.
|
| |
Personal Information
What is your user ID and Registration key?
In many cases this information is filled in for you.
If not then enter your Customer ID (1 - 9999) and the Registration key that we have sent you.
|
|
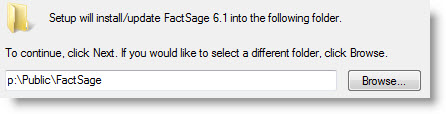
Select Destination Location
Where should FactSage be installed?
Enter the name of the public 'share read-only' directory where FactSage is to be installed.
The directory must reside on a fixed hard disk.
FactSage server installations are not supported on virtual machines.
You can use a long file name with up to 64 characters including spaces.
We strongly recommend you use the sub-folder name FactSage - for example:
p:\Public Apps\Thermo\FactSage
|
|
Setup is now ready to start installing FactSage on Network Server.
For screen shots of the installation process click on
Show Installation Process.
|
After Setup has finished installation, click on the FactSage shortcut to launch the program.
|
|
Warning message - access to local network
When you launch FactSage a program called CheckKeyEB.exe is run and
it checks for security keys (dongles) on the network.
You may get a warning message from your antivirus and firewall sofware about accessing the local network.
It is safe to grant CheckKeyEB access to the local network.
|
For a Network Server installation you will not be using a MemoHASP Security Key.
Simply ignore the message.
|
With a new installation of FactSage on the Server
you will see the green FactSage-Setup window.
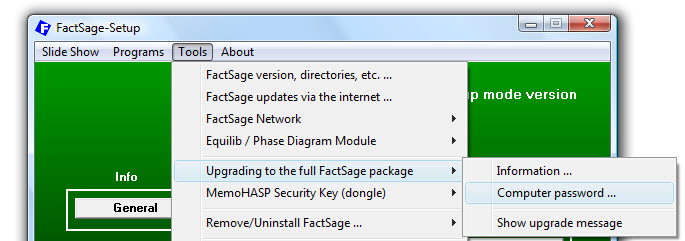
To activate the full FactSage package you need a server computer password which you obtain
from us.
Click on 'Tools > Upgrading ... > Computer password ...' and
follow the instructions.
When done you will email us a file called ID.txt.
After FactSage 8.3 is installed on the Server (with or without a computer password),
you are now ready for
2.3 Install Network Client.
Network Client
- the computer will access and copy FactSage programs and databases already installed
on another computer (Network Server).
|
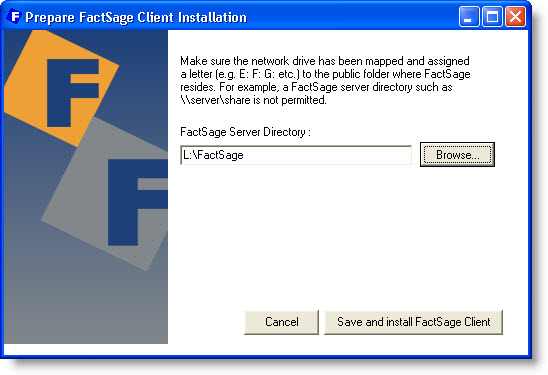
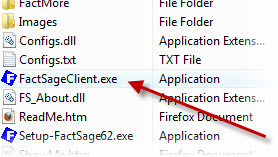
Run FactSageClient
Before installing FactSage on the client computer you must first run FactSageClient.exe in order to
locate the Server Directory where FactSage.exe is installed on the network.
|
 |
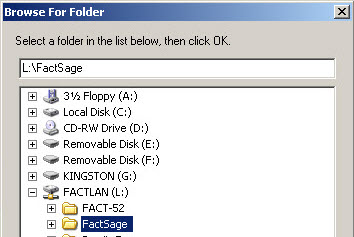
Make sure that network drive has been mapped and assigned a letter
to the public folder where FactSage resides.
A FactSage Server Directory such as \\server\share is not permitted.
Click on Map Network Drive to assign a letter - here it is "L".
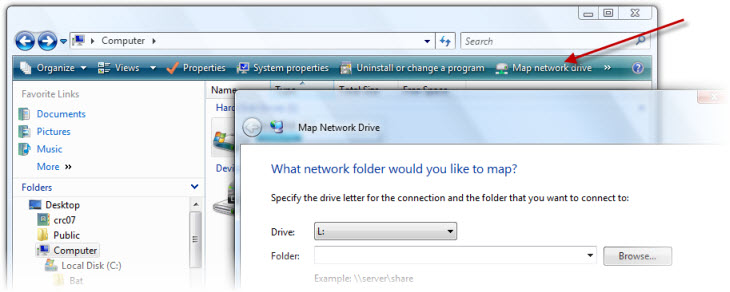
When finished click on Save and install FactSage client.
This will load and run Setup-FactSage83.exe.
 |
Select option Network Client and then click on Next >.
|
|
Select Destination Location
Where should FactSage be installed on the client computer?
We strongly recommend you use the default folder c:\FactSage
Alternatively, you can use a long file name with up to 64 characters including spaces.
In this case we recommend you use the sub-folder \FactSage - for example:
c:\MyApps\My Thermo Applications\FactSage
|
|
| |
Select Start Menu Folder
Where should Setup place the program shortcut?
We recommend you use the default name FactSage.
|
Setup is now ready to start installing FactSage.
For screen shots of the installation process click on
Show Installation Process.
|
After Setup has finished installation, click on the FactSage shortcut to launch the program.
|
|
If the Network Server does not have a valid computer password,
then the FactSage menu will appear as a green window in FactSage-Setup mode.
2.4 Show Installation Process
|
The Installation Process is identical for the 3 types of installation
(2.1 Standalone Single User, 2.2 Network Server, 2.3 Network Client).
| |
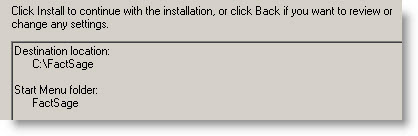
Ready to Install
Setup is now ready to begin installing FactSage on your computer.
Click on Install to continue with the installation or click on < Back to change the settings.
|
|
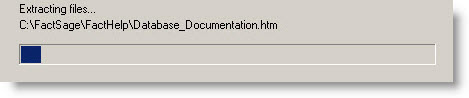
Installing
Please wait while Setup installs FactSage on your computer.
Setup may pause for several minutes during the installation
especially if the Setup program is stored on a memory stick.
Click on Cancel any time to pause or stop Setup.
|
|
| |
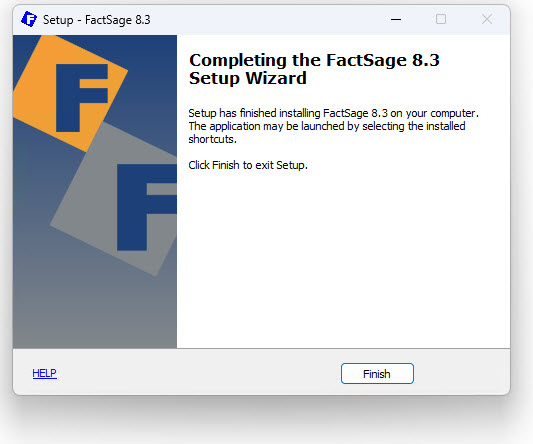
In order to complete the installation you must click on Finish when done.
|
|
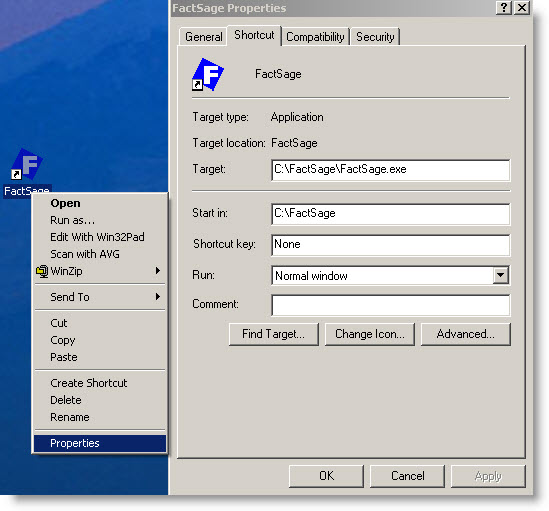
A FactSage shortcut should appear on the desktop.
Mouse-right-click on the FactSage shortcut to list the properties.
Select 'rename' if you wish to change the name of the shortcut.
|
 |
|
Click on the FactSage shortcut to launch the program.
|
|
To continue select one of
3. Update/Refresh FactSage 8.3
|
 |
The FactSage 8.3 Installation program enables you to update/refresh the FactSage 8.3 software,
documentation and databases that are already installed on your computer.
Due to the extensive changes in FactSage 8.0 - 8.3
we recommend that you do not upgrade any FactSage 7.0 - 7.3
currently installed on your computer but rather install FactSage 8.3 as a New FactSage installation.
.
You can update/refresh a FactSage Standalone computer or a Network
Server. In the case of a network installation it is
only necessary to update/refresh the Network Server. |
|
Select Destination Location
You must locate the FactSage folder that you wish to update/refresh.
Click on 'Browse' if necessary.
The FactSage folder is where FactSage.exe resides.
|
|
| |
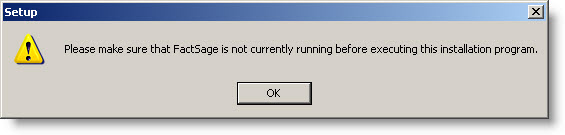
Running
If FactSage is currently running then you will see this message.
You must quit FactSage for Setup to proceed.
In the case of a Network Server installation this means that no client installation can
be running FactSage. It may be necessary to temporarily disable the network access to FactSage
in order to close all FactSage Client applications.
|
|
Updating
Please wait while Setup updates FactSage on your computer.
Setup may pause for several minutes during the installation
especially if the FactSage setup program is stored on a memory stick.
Click on Cancel any time to pause or stop Setup.
Click on Finish when done.
|
|
Here the name of the FactSage shortcut is 'FactSage'.
If wish to rename it simply point to the shortcut, mouse-right-click and select 'rename'.
|
|
4. Refresh Databases in 8.3
|
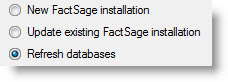 |
This option was available in FactSage 8.0 and prior versions but
it is no longer available since it serves no useful purpose.
|
Status of FactSage Dongles
|
(FactSage Menu > 'Tools > FactSage dongle status > Explanation of dongle status ...' )
In order to activate a Standalone version of FactSage, a MemoHASP dongle (also known as a hardware lock or security key) must be inserted into a USB port of the PC.
The MemoHASP dongles are also referred to as a Sentinel HASP and more recently Sentinel LDK keys.
The dongles are supplied by
SafeNet Inc.
|
The dongle red light or LED glows continuously when both the dongle and its drivers (files) are installed correctly.
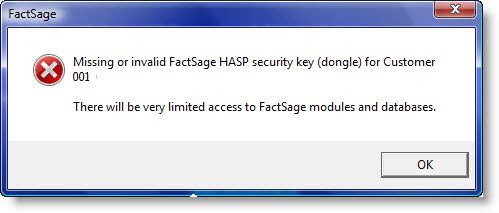
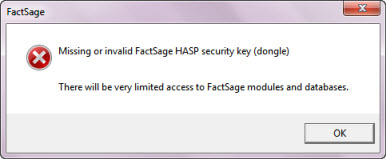
If FactSage issues an error message about a 'missing or invalid FactSage HASP security key'
it goes into the FactSage SetUp mode with a green screen.
There are various factors that cause this to happen.
|
|
 |
|
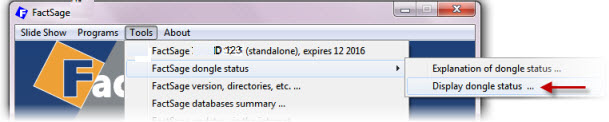
There is an option in FactSage Main Menu Window that displays the status of the FactSage dongle attached to the computer.
This helps you to determine the source of the error message.
Run FactSage 8.3 and display the FactSage Main Menu Window.
Click on 'Tools > FactSage dongle status > Dongle status display ... '
|
|
 |
|
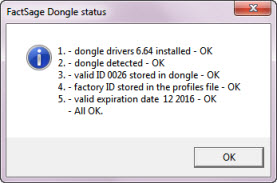
The 'FactSage dongle status' Window shown here is for an installation where a
valid FactSage dongle is attached and everything is in order (i.e. 1. - 5. All OK).
|
|
 |
List of possible error messages in FactSage dongle status :
- 1. - Dongle drivers out of date or not installed
If the dongle is firmly attached to the computer but the red light or LED does not glow continuously then the drivers (files) have not been installed correctly.
The Sentinel HASP dongles can only be accessed by FactSage if the recent Sentinel dongle drivers (files) have been installed on the computer.
FactSage 8.3 employs installation software from SafeNet Inc. and it is fairly straight forward to install the drivers.
For detailed information go to
How to Install the Sentinel HASP Drivers
and follow the instructions.
- 2. - Dongle not detected
After the dongle drivers are installed and the dongle is attached,
after a while the dongle red light or LED should glow constantly.
Only FactSage dongles issued by the CRCT (IDs 1 - 1000, code AQWDB) and GTT-Technologies (IDs 5000- 6000, code KEYKE)
can be detected by FactSage 8.3 .
- 3. - Invalid customer ID stored in dongle
This is the case where the FactSage dongle attached to the computer is for a different customer.
- 4. - Dongle factory ID missing from profiles file
Each dongle has a unique factory ID (e.g. 12345678).
This value must be stored in the user profiles file (e.g. Profiles83.ini) which is stored in the \FACTDATA folder.
Please contact us if the dongle factory ID is missing from your profiles file.
- 5. - Dongle expiration date stored in profiles file has passed
The dongle expiration date (mm yyyy) listed in the profiles file has passed.
This date is stored in the profiles file.
We can activate a particular dongle and change its 'expiration date' by editing your profiles file which you can then download.
Please contact us.
How to Install the Sentinel HASP Drivers
|
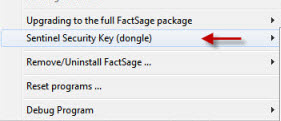
(FactSage Menu > 'Tools > Sentinel Security Key > How to Install the drivers.' )
In order to activate a Standalone version of FactSage, a MemoHASP dongle (also known as a hardware lock or security key) must be inserted into a USB port of the PC.
The MemoHASP dongles are also referred to as a Sentinel HASP and more recently Sentinel LDK keys.
The dongles are supplied by
SafeNet Inc.
If the dongle is firmly attached to the computer but the red light or LED does not glow continuously then the drivers (files) have not been installed correctly.
FactSage 8.3 employs installation software from SafeNet Inc. and it is fairly straight forward to install the drivers.
There are two ways to install the drivers.
1. Express driver installation
This is a fast and efficient way of installing the Sentinel dongles drivers.
In most cases the following instructions should work the first time.
- Make sure you logged in as administrator (it may also be necessary to disable any protection software such as antivirus and firewall).
Remove any HASP or Sentinel key/dongle attached to the computer.
Disconnect the network cable and disable the wireless LAN connections if applicable.
- You are going to first remove any old dongle drivers from the computer
and then you are going to install the new Sentinel drivers.
- Run FactSage 8.3 and click the Tools menu at the top:
'Tools > Sentinel Security Key (dongle) > Express driver installation'
and follow the instructions.
|
|
 |
- Connect the dongle and see if the red light or LED is on. It may take a while to light, then blink a while and then finally glow constantly.
- If the dongle drivers have been successfully installed and the light is on then quit FactSage, turn on the antivirus and firewall that were disabled earlier, reconnect the network cables or the wireless LAN connections, and then run FactSage.
-
If the dongle does not glow constantly or if the dongle status still displays
'dongle drivers NOT installed' then try the following 2. Manual driver installation.
2. Manual driver installation
This is a step by step manual way of installing the Sentinel dongles drivers.
- Make sure you logged in as administrator (it may also be necessary to disable any protection software such as antivirus and firewall).
Remove any HASP or Sentinel key/dongle attached to the computer.
Disconnect the network cable and disable the wireless LAN connections if applicable.
- You are going to first remove any old dongle drivers from the computer
and then you are going to install the new Sentinel drivers.
- Run FactSage 8.3 and click the Tools menu at the top:
'Tools > Sentinel Security Key (dongle) > Remove drivers'
- you will get the message "Please wait ..." and then "Operation successfully completed"
- this may take several minutes.
- Reboot the computer.
- Run FactSage 8.3 and click the Tools menu at the top:
'Tools > Sentinel Security Key (dongle) > Install drivers'
- you will get the message "Please wait ..." and then "Operation successfully completed"
- this may take several minutes.
|
|
|
- Reboot the computer.
- Connect the dongle and see if the red light or LED is on. It may take a while to light, then blink a while and then finally glow constantly.
- If the dongle drivers have been successfully installed and the light is on then quit FactSage, turn on the antivirus and firewall that were disabled earlier, reconnect the network cables or the wireless LAN connections, and then run FactSage.
If the FactSage dongle does not glow constantly or if the dongle status still displays
'dongle drivers NOT installed' check out the following section
3. Errors while installing drivers.
3. Errors while installing drivers
For more information go to the SafeNet Admin Control Center Help at
http://localhost:1947
for real time Diagnostics for Sentinel License Manager and other options.
6. Common Problems - Windows XP, Network, Databases
|
Problems with installing and running FactSage are
often associated with the following topics:
1. Windows XP
FactSage should still run under Windows XP even though Windows XP is no longer supported by Microsoft.
But according to Microsoft if you continue to use Windows XP now that support has ended,
your computer will still work but it might become more vulnerable to security risks and viruses.
2. Installing/Updating FactSage 8.3 on the Network
Problems often occur when the program
is given to the Network Manager who is unfamiliar with
FactSage software and databases.
In such a case we recommend that the Network Manager
works with someone who has already installed FactSage as a standalone version,
and successfully accessed the various modules and databases.
IT
specialists will take short cuts when installing new software. Making virtual
copies of the FactSage Installation files in order to speed up installations
on FactSage Client computers is a common error.
For
University installations, if the Network Manager is a graduate student it
is important that the Professor keeps track of the original installation
package, updates and dongles as well as, of course, the graduate student.
3. New Databases
It may be necessary
to work with the Network Manager especially when installing new databases.
For large installations, Network Managers routinely backup all network files.
Manually copying directories and files to the FactSage directories from
backups can create problems and cause FactSage to go into SetUp mode.
There
is a 'learning curve' on how to use the FactSage databases.
After the new databases have been installed, you should consult the information
(in the FactSage Main Menu click on 'Documentation')
which describes all the databases,
how to select phases, suppress duplicates, etc.
At the bottom of the Documentation is the section
List of database files stored in \FACTDATA that explains how to
include/exclude databases in a calculation.
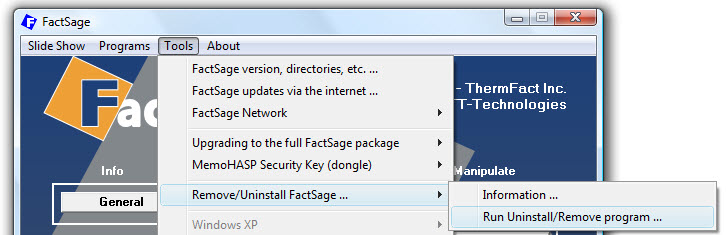
To remove FactSage click on
'Tools > Remove/Uninstall FactSage > Run Uninstall/Remove Program ...' and follow the instructions.
After FactSage has been uninstalled you will see that not all files stored in the FactSage folder
were deleted. To complete the uninstallation you should then delete the FactSage folder and its contents.
[www.FactSage.com]
[F*A*C*T] [GTT]